【C++/MinGW】FreeTypeを使ってTTFファイルから文字レンダリング
FreeTypeとは?
FreeTypeはフォントエンジンを実装したライブラリです。つまり、std::stringとかcharとかの文字列を画像に変換することができます。この時、フォントファイル(ttf等)を指定したり、太字/斜体でレンダリングすることできます。TrueType、Type1フォント、OpenTypeなどのフォント形式をサポートしているようです。
FreeTypeのインストール
まず、下のURKから、最新版のFreeTyoeをダウンロードしてきます。
FreeType Downloads
僕がダウンロードしたのはバージョン2.10.4です。
解凍して中身を見ると、CMakeListsがあったので、CMakeで入れることにします。
$ cd [ダウンロードしたFreeTypeライブラリのフォルダ]
$ mkdir build
$ cd build
$ cmake .. -G "MinGW Makefiles"
$ make
下から二行目の"MinGW Makefiles" はコンパイラを指定しているだけで、通常は付ける必要はありません。筆者の環境ではVisualStudioのコンパイラとg++が混在しているので一応指定しておいただけです。
makeコマンドがうまくいくと、作成したbuildフォルダの中に「libfreetype.a」ができるので、これをリンクすればOKです。
サンプルコード
#include <opencv2/opencv.hpp>

#include <stdio.h>
#include <math.h>
#include <codecvt>
#include <string>
#include <iostream>
#include <locale>

#include <ft2build.h>
#include FT_FREETYPE_H

#define WIDTH   500
#define HEIGHT  300


class TextRender{
private:
  FT_Library library;   /* handle to library     */
  FT_Face face;      /* handle to face object */
  unsigned char *image;
  void draw_bitmap(int x, int y);
  FT_GlyphSlot slot;  // グリフへのショートカット
  std::u32string  u32str;

public:
  TextRender();
  ~TextRender();
  bool init();
  bool setFont(const char *font_file_name, int char_width, int char_height);
  void drawString(const char text[]);
  unsigned char *getImage();
};

TextRender::TextRender():image(nullptr){ init();}


// 1. libraryを初期化
bool TextRender::init(){
  if(image != nullptr) free(image);
  image = nullptr;
  auto error = FT_Init_FreeType( &library ) ;
  if (error) { std::cerr << "[ERROR] Failed to init FreeType library!" << std::endl; }
  return !error;
}

//フォントファイルを読み込む
bool TextRender::setFont(const char *font_file_name, int char_width, int char_height){
  // 2. faceを作成
  auto error = FT_New_Face( library, font_file_name, 0, &face);
  if ( error == FT_Err_Unknown_File_Format ){
    std::cerr << "[ERROR] Font file format is not supported!! " << std::endl; return false;
  }else if ( error ){
    std::cerr << "[ERROR] Font file not found or it is broken! " << std::endl; return false;
  }

  // 3. 文字サイズを設定
  error = FT_Set_Char_Size(face, 0,
                  char_width*char_height, // 幅と高さ
                  300, 300);  // 水平、垂直解像度*/

  slot = face->glyph;  // グリフへのショートカット
  return !error;
}


void TextRender::drawString(const char text[]){
  image = new unsigned char[WIDTH*HEIGHT];

  std::u32string  u32str  = std::wstring_convert<std::codecvt_utf8<char32_t>, char32_t>().from_bytes(text);

  int curPosX = 0;
  int curPosY = 60; //現在のカーソル位置
  int last_height = 0; //最後に文字を書いたときの文字の大きさ

  for (int n = 0; n < u32str.size(); n++ ){
    if(u32str[n] == '\n'){
      curPosX = 0;
      curPosY += last_height + 20;
    }else{
      if (FT_Load_Char( face, u32str[n], FT_LOAD_RENDER )) continue; //一文字レンダリング
      // int yMax = face->bbox.yMax;
      // int yMin = face->bbox.yMin;
      // int baseline = bitmap->rows * yMax / (yMax - yMin);
      draw_bitmap(curPosX, curPosY - slot->bitmap_top); //imageにslot->bitmapの中身をコピーする
    }
    last_height = (slot->bitmap).rows;

    curPosX += slot->advance.x >> 6;
    curPosY += slot->advance.y >> 6;
   }
};

//生成された位置も自分の画像データをimageにコピーする
void TextRender::draw_bitmap(int x, int y){
  int  i, j, p, q;
  const int  x_max = x + (slot->bitmap).width;
  const int  y_max = y + (slot->bitmap).rows;

  for ( i = x, p = 0; i < x_max; i++, p++ ){
    for ( j = y, q = 0; j < y_max; j++, q++ ){
      if ( i < 0      || j < 0       || i >= WIDTH || j >= HEIGHT) continue;
      image[j*WIDTH + i] |= (slot->bitmap).buffer[q *(slot->bitmap).width + p];
    }
  }
}


unsigned char *TextRender::getImage(){ return image; }

TextRender::~TextRender(){
  if(image != nullptr) free(image);
  FT_Done_Face    ( face );
  FT_Done_FreeType( library );
}


int main(){
  TextRender TR;
  TR.setFont("Meiryo.ttf", 16, 34);


  //レンダリング
  unsigned char *image;
  const char text[] = "こんにちは、世界!\nHello, World!!";
  TR.drawString(text);
  image =  TR.getImage();


  //画像を表示
  cv::Mat image_cv(HEIGHT, WIDTH, CV_8UC1,image);
  cv::imshow("output", image_cv);
  cv::waitKey(0);

  return 0;
}
上のコードをコンパイルする為のCmakeListtsも載せておきます。
CmakeListsでしていることは
- OpenCVを見つけていれる
- [ダウンロードしたFreeTypeライブラリ]/includeフォルダを#includeでの読み込み対象にする
- libfreetype.aをリンクする
- main.cpp(上のプログラムのこと)から実行ファイルを生成
という感じです
cmake_minimum_required( VERSION 3.5 )
project(test CXX)

set(OpenCV_DIR "C:/Users/Owner/Library/Opencv/opencv-3.4/build_mingw")
find_package(OpenCV REQUIRED)
if(OpenCV_FOUND)
    include_directories(${OpenCV_INCLUDE_DIRS})
    link_libraries(${OpenCV_LIBS})
endif()

set(FREETYPE_DIR "C:/Users/Owner/Library/freetype-2.10.4")
include_directories(${FREETYPE_DIR}/include)

add_executable( test main.cpp)
target_link_libraries( test ${FREETYPE_DIR}/build/libfreetype.a ${OpenCV_LIBRARIES})
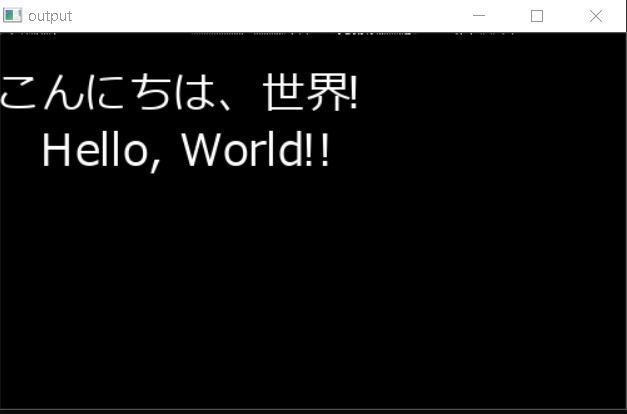
実行結果
下の画像の様な結果になります
Meiryo.ttfが読み込まれて日本語もきちんと表示できているのがわかると思います

FreeTypeの使い方
初期化
まず、こんな感じでincludeします
#include <ft2build.h>
#include FT_FREETYPE_H
次に、色々初期化します。
FT_Library library;
FT_Face face;

// 1. libraryを初期化
auto error = FT_Init_FreeType( &library ) ;
if (error) {... }

// 2. faceを作成
error = FT_New_Face( library, "hoge.ttf", 0, &face);
if (error) {... }


  // 3. 文字サイズを設定
  error = FT_Set_Char_Size(face, 0,
                  16*54, // 幅と高さ
                  300, 300);  // 水平、垂直解像度*/
ここでいじるのはフォントファイル名と文字サイズくらいだと思います
太字or斜体に設定する
太字や車体などの設定は、以下の関数を使ってグリフに適応させます
FT_GlyphSlot_Oblique(face->glyph );  //斜体にする
FT_GlyphSlot_Embolden(face->glyph );//太字にする
これらを使うにはグリフを読み込む必要があり、TextRender::drawString関数のfor文の中身を以下の様に変更する必要があります。
  for (int n = 0; n < u32str.size(); n++ ){
    if(u32str[n] == '\n'){
      curPosX = 0;
      curPosY += last_height + 20;
    }else{
     // 追加!今からレンダリングする式のグリフを取得
      FT_UInt glyph_index = FT_Get_Char_Index( face, u32str[n] );

     // 追加!そのグリフの設定を読み取る(ここで1bitビットマップに設定したりカラー画像にしたり色々変えられる)
      auto error = FT_Load_Glyph( face, glyph_index, FT_LOAD_DEFAULT );
      if ( error )continue;  /* ignore errors */

     // 追加!
      FT_GlyphSlot_Oblique(face->glyph );  //斜体にする
      FT_GlyphSlot_Embolden(face->glyph );//太字にする

      //追加!1文字レンダリング!
      error = FT_Render_Glyph(slot, FT_RENDER_MODE_NORMAL );
      if ( error ) continue;

      draw_bitmap(curPosX, curPosY - slot->bitmap_top); //imageにslot->bitmapの中身をコピーする
    }
    last_height = (slot->bitmap).rows;

    curPosX += slot->advance.x >> 6;
    curPosY += slot->advance.y >> 6;
   }
上のプログラムの様に、各文字のグリフを取得して、それ経由でレンダリングすることもできます。その時に、太字は斜体などの設定をグリフに適応させる、という事でしょう。
ちなみに、最初のプログラムで使っていた FT_Load_Char関数とごちゃ混ぜにするとフリーズするので気を付けてください。
また、FT_GlyphSlot_Oblique関数とFT_GlyphSlot_Embolden関数は freetype/ftsynth.h で宣言されているので、冒頭のinclude文を
#include <ft2build.h>
#include <freetype/ftsynth.h>
#include FT_FREETYPE_H
に書き直してください
参考サイト→FreeType2での太字、斜体 - HYPERSPACE UNIVERSE NEWS
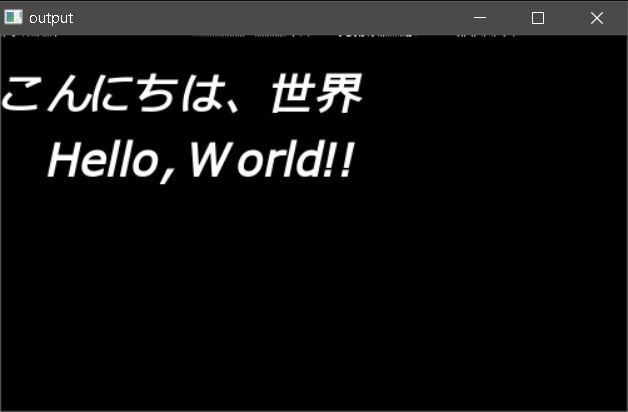
実行するとこうなります:

レンダリング(方法1)
FT_Load_Char( face, ’a’, FT_LOAD_RENDER)
このように書くことで、'a'という一文字がレンダリングされて、face->glyph.bitmapにビットマップとして格納されます。(上のプログラムでは、slot = face->glyph;というショートカットを作成しているので、slot->bitmapと書いています)
このビットマップのサイズ等は以下の様に取得できます
| 値 | 計算 |
| 横幅 | slot->bitmap.width |
| 高さ | slot->bitmap.rows |
| yMax | face->bbox.yMax; |
| yMin | face->bbox.yMin |
| 文字のベースライン | bitmap->rows * yMax / (yMax - yMin) |
yMinとyMaxが何を意味するのか分かりませんが、文字のベースラインを計算するにはこの値を使うみたいです。
レンダリング(方法2)
「太字or斜体にする」の節で使用した、グリフに基づくレンダリング方法です
// 文字'a'のグリフを取得
FT_UInt glyph_index = FT_Get_Char_Index( face, 'a');
auto error = FT_Load_Glyph( face, glyph_index, FT_LOAD_DEFAULT );// そのグリフの設定を読み取る
FT_Render_Glyph(slot, FT_RENDER_MODE_NORMAL );//1文字レンダリング!
行数が上の方法1の三倍になっていますが、やっていることは同じで「a」をface->glyph.bitmapにビットマップとして格納します
【Python】無料でジオコーディング(住所→緯度経度etc.)
住所⇔緯度&経度の変換をしたい、目的地までのルート検索や所要時間を調べたい、と思い良いものがないかなぁと思っていました。
すると、↓の記事でGoogle Maps APIというものがあることを知り、
qiita.com
使ってみよ~~、と思ったのですが、なんと有料でした!
一学生として有料は厳しい、、、、。で調べていくと、OSM(Open Street Map)が提供しているデータを使えばジオコーディングが無料でできるらしい。おお~~(≧▽≦)
geopyというものを使うと、住所→緯度&軽度の取得ができます
- Python 3.7.3 on win32
- geographiclib-1.50 geopy-2.0.0
$ pip install geopy
でgeopyを入れます。
プログラム
# -*- coding: utf-8 -*-
from geopy.geocoders import Nominatim

def main():
  geolocator = Nominatim(user_agent="test-dayo")
  location = geolocator.geocode("日本 北九州")
  print("Lat, long = ",location.latitude, location.longitude)
  print("full address = ", location.address)

  # 辞書として読み取る
  loc_dict = dict(location.raw)
  print("Lat, long = ", loc_dict["lat"], loc_dict["lon"])
  print("full address = ", loc_dict["display_name"])
  print("class and type = ", loc_dict["class"], loc_dict["type"])

  url = f"https://www.google.com/maps/search/?api=1&query={location.latitude, location.longitude}"

  import webbrowser
  webbrowser.open(url)

main()
上のプログラムを実行すると、
Lat, long =  35.675886399999996 139.74505141191034
full address =  国会議事堂, 1, 国道246号, 永田町1, 永田町, 千代田区, 100-0014, 日本 (Japan)
Lat, long =  35.675886399999996 139.74505141191034
full address =  国会議事堂, 1, 国道246号, 永田町1, 永田町, 千代田区, 100-0014, 日本 (Japan)
class and type =  office government
と表示され、ブラウザで国会議事堂のGoogleMapが開くと思います。

ほかのライブラリ
他にも数種類GeoCodingをするPythonライブラリがあるみたいです。
GeoCoder
$ pip install geocoder
でgeocoderを入れます。
import geocoder

# 下のコードはGoogleAPIの登録が必須になってから動かなくなっている
# g = geocoder.google('Mountain View, CA')
# print(g.latlng)

location = '日本 国会議事堂'
ret = geocoder.osm(location, timeout=5.0)
print(ret.latlng)

# 出力結果:[35.675886399999996, 139.74505141191034]
【OpenCV/C++】画像の一部分を修復する(cv::inpaint)
今回すること
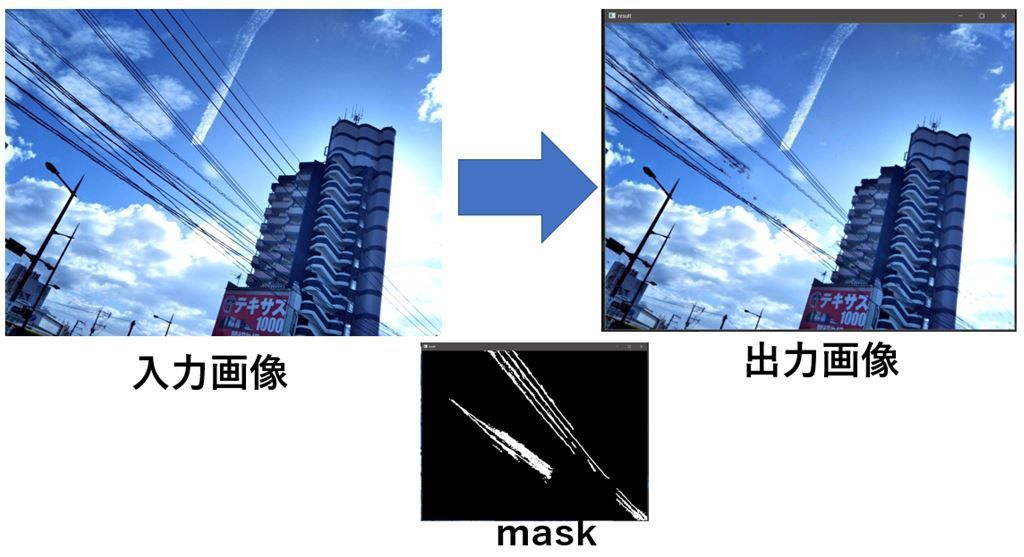
OpenCVを用いて画像の一部を修復します。例えば、下の画像の様に、電線だけ消す、というようなことができます。(下の方は失敗していますが、一番上4本の電線はかなりきれいに消えていると思います)

このような画像修復を行うために、cv::inpaintを用います。
// inpaintMaskのピクセル値が0でないピクセルを修復します。
void inpaint(const Mat& src, const Mat& inpaintMask, Mat& dst, double inpaintRadius, int flags)
引数:
| src | 入力画像。8ビット,1あるいは3チャンネル |
| inpaintMask | 8ビット,1チャンネル。修復領域を指定する |
| dst | src と同じサイズ,同じタイプの画像。修復画像が出力される |
| inpaintRadius | 修復される各点を中心とする近傍円形領域の半径。この領域がアルゴリズムに考慮される |
| flags | 修復手法。cv::INPAINT_NS (ナビエ・ストークス(Navier-Stokes)ベースの手法)または、cv::INPAINT_TELEA( Alexandru Telea による手法)の2通り |
qiita.com
このブログでとても詳しく説明されているので、今回は適当にコード書いて終わります。
プログラム
#include <opencv2/opencv.hpp>
#include <opencv2/imgcodecs.hpp>
#include <opencv2/highgui.hpp>
#include <opencv2/imgproc.hpp>
#include <iostream>

using namespace cv;
using namespace std;

bool LbtnPushed, need_update;
cv::Mat src, mask, result_img;


static void on_mouse(int event, int x, int y, int flags, void* param){
  const int radius = 2;

  switch (event){
  case EVENT_LBUTTONDOWN:
    LbtnPushed = true;
    break;

  case EVENT_LBUTTONUP:
    LbtnPushed = false;
    break;

  case EVENT_MOUSEMOVE:
    if (LbtnPushed){
      circle(mask, cv::Point(x, y), radius, 255, -1);// 消去する部分のmaskの画素値を1以上にする(←のプログラムだと255)
      need_update = true;
    }
    break;
  }
}


bool loop() {
  if (need_update) {
    Mat binMask;
    binMask = mask & 1; //binMaskは、maskがGC_FGD(=1)とGC_PR_FGD(=3)のピクセルが1になり、それ以外は0になる
    result_img = cv::Mat(src.size(), CV_8UC3, cv::Scalar(0, 255, 0)); //全面緑の画像作成
    src.copyTo(result_img, binMask); //binMaskが1の部分だけをresult_imgにコピーする
    cv::inpaint(src, mask, result_img, 2, cv::INPAINT_TELEA);

    need_update = false;

  }
  cv::imshow("result", result_img);
  cv::imshow("mask", mask);
  return !(cv::waitKey(1) == 27);
}

int main(){
  namedWindow("result", WINDOW_AUTOSIZE);
  setMouseCallback("result", on_mouse, 0);
  need_update = true;

  src = cv::imread("test.jpg");

  mask.create(src.size(), CV_8UC1);
  mask.setTo(Scalar::all(0));
  //mask = cv::imread("mask.png", 0);
  while(loop()){}

  return 0;
}
実行結果
上のプログラムを実行して、src画像の上でマウスを左クリック→ドラッグすると、その部分が修復領域に指定され、修復された画像が再描画されます。
手作業で頑張って修復させると下画像のようになります。
