【Ubuntu】Node.jsのインストールと使い方
UbuntuでNode.jsサーバーを動かしてみます。
動作環境はこちら:

Node.jsとは
- JavaScriptを用いたサーバーサイドの実行環境です。
- Chrome's V8 JavaScript engineを用いており、比較的高速に動作する
- モジュール管理にnpm(Node Package Manager)を使う。インストールや削除などが簡単に行える。
まあ詳しい話は公式サイトなどを参考に↓
nodejs.org
環境構築とバージョン確認
以下のコマンドを実行するだけ
$ sudo apt update
$ sudo apt install nodejs
$ sudo apt install npm
インストールできたかどうか確認
$ npm --version
6.14.4

$ node --version
v10.19.0
Hello World()
適当なディレクトリにいって、
var http = require('http');
var fs = require('fs');

http.createServer(function (req, res) {
  console.log("New Access!!");
  console.log("URL: " + req.url);
  console.log("Method: " + req.method);

  switch (req.url) {
    case "/":
      fs.readFile("./index.html", function (err, data) {
          res.writeHead(200, { "Content-Type": "text/html" });
          res.write(data);
          res.end();
      });
      break;
    case "/style.css":
      fs.readFile("./style.css", function (err, data) {
          res.writeHead(200, { "Content-Type": "text/css" });
          res.write(data);
          res.end();
      });
      break;
  }
}).listen(8000);
上のファイルをmain.jsのような名前で保存します。
同様のディレクトリにindex.htmlとstyles.cssも作成します。
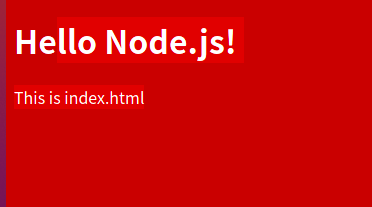
<!DOCTYPE html>
<html>
  <head>
    <link rel="stylesheet" href="./style.css" />
    <title>Hello</title>
  </head>
  <body><h1>Hello Node.js!</h1><p>This is index.html</p></body>
</html>
body {
	width: 100%;
    background-color: #b00;
    color:#fff;
}
そして、
$ node main.js
を実行するとサーバーが起動します。「ブラウザで 127.0.0.1:8000/」にアクセスすると以下のように表示されます。
Hello World(express編)
expressとは、Node.jsの中でおそらく一番使われているWebフレームワークです。
expressjs.com
以下のようなファイルでmain2.jsを作ります。
// $ npm install express # これをJS実行前に実行して、Expressをインストールする。-gをつけるとグローバルにインストールされます。

var express = require('express');
var fs = require('fs');
var bodyParser = require('body-parser');
var app = express();

//ミドルウェアの設定:
//すべてのリクエストに対応するapp.get(), app.post()が呼ばれる前にこの関数が実行される。
//next()関数が呼ばれるとapp.get(), app.pos()が呼ばれる。
app.use(function(req, res, next){
  console.log("New access " + req.method + "\t" + req.url);
  next();
});

app.get('/home', function(req, res) {
  res.type('text/html').send(`<h1>This is home!!</h1><p><a href="/">open index.html</a></p>`)
});


app.get('/', function(req, res) {
    fs.readFile("./index.html", function (err, data) {
        res.writeHead(200, { "Content-Type": "text/html" });
        res.write(data);
        res.end();
    });
});

app.get('/style.css', function(req, res) {
  fs.readFile("./style.css", function (err, data) {
      res.writeHead(200, { "Content-Type": "text/css" });
      res.write(data);
      res.end();
  });
});

app.get('/redirect', function(req, res) {
  res.redirect("/home");
});


app.get('/form', function(req, res) {
  res.type('text/html').send(`
    <!DOCTYPE html>
    <html>
      <head><title>Form sample</title></head>
      <body>
        <h1>Form sample</h1>
        <form action="/post" method="POST">
          <input type="text" name="text1"><br>
          <input type="text" name="text2">
          <input type="submit" value="送信">
        </form>
      </body>
    </html>
  `)
});

app.post('/post',function(req, res, next){
  console.log(req.body);
  res.send(req.body);
});

app.listen(8000); //8000ポートを開く
また、index.htmlとstyles.cssも前節で書いたものをコピペしてきます。
そして、実行するには以下のコマンドを実行します。
$ npm install express #expressをインストール
# ↑のコマンドだと、現在いるフォルダに node_modules フォルダが作成されて、その中にインストールされる。
# グローバルにインストールするには、npm install -g expressのように -g をつける必要がある。
$ node main2.js
以下の場所にアクセスできます。
| URI | 説明 |
| localhost:8080/ | index.htmlを表示 |
| localhost:8080/home | JSに埋め込んであるHTML文字列を表示 |
| localhost:8080/redirect/ | /homeにリダイレクトします。 |
| localhost:8080/form | 2つのテキストボックスに文字列を入力して送信するとサーバーにデータが送られる。 |
gitignoreの書き方
以下のファイルはgitで管理する必要がありません。
| ファイル名 | 説明 |
| --- | --- |
| node_modules | npm installでインストールしたNpde.jsのモジュールが入っています。 |
| package-lock.json | npm install でインストールしたモジュール情報が記載されています。**手動で編集してはいけない!!!** |
【Node.js + Express】WebSocketを使ってみる( + 全クライアントに一斉送信)
解説が面倒なのでサンプルだけ。
サンプル1
- WebSocketを使ったNode.jsのサンプルです。
- 動作は
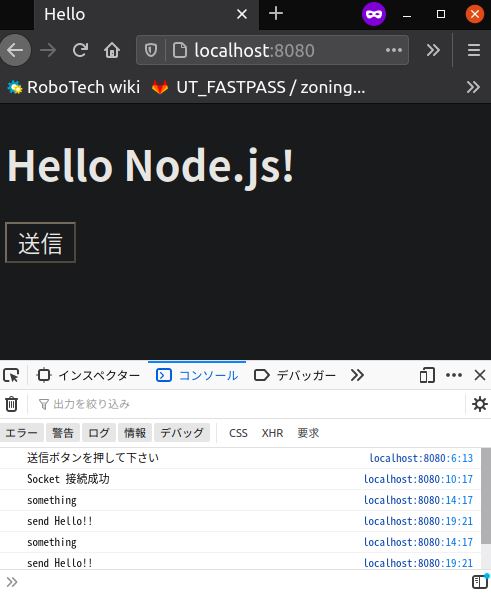
- 送信ボタンを押すと、WebSocketを使ってサーバーに「Hello」文字列が送信されます。
- サーバーのコンソールにWebSocketで受信した文字列(Hello)が表示され、クライアントにWebSocketを使って文字列を送り返します。
- という感じです。
- F12などで開発者ウィンドウを開いて、console.log() で出力された内容が見られるようにしておく必要があります。
const express = require('express');
var fs = require('fs');

const app = express();
const WebSocket = require('ws');
const wss = new WebSocket.Server({ port: 8000 });

wss.on('connection', function connection(ws) {
  ws.on('message', function incoming(message) {
    console.log('received: %s', message);
    ws.send('something');
  });
  ws.send('something');
});


app.get('/', function(req, res) {
    fs.readFile("./index.html", function (err, data) {
        res.writeHead(200, { "Content-Type": "text/html" });
        res.write(data);
        res.end();
    });
});

app.listen(8080);
以下の内容で「index.html」を作成します。
<!DOCTYPE html>
<html>
<head><meta charset="UTF-8" /><title>Hello</title></head>

<script type="text/javascript">
    console.log("送信ボタンを押して下さい");
    var sock = new WebSocket('ws://127.0.0.1:8000');

    sock.addEventListener('open',function(e){// 接続
        console.log('Socket 接続成功');
    });

    sock.addEventListener('message',function(e){// サーバーからデータを受け取る
        console.log(e.data);
    });

    document.addEventListener('DOMContentLoaded',function(e){
        document.getElementById('sample').addEventListener('click',function(e){
            console.log("send Hello!!");
            sock.send('hello');// WebSocketでサーバーに文字列を送信
        });
    });
</script>
</head>

<body>
    <h1>Hello Node.js!</h1>
    <input type="button" id="sample" value="送信">
</body>
</html>
サンプル2 同時に全クライアントに送信する
以下のように、CLIENT配列を作ることで、現在接続されているすべてのクライアントにWebSocketで送信された文字列を共有することができます。
const express = require('express');
var fs = require('fs');
const app = express();
const WebSocket = require('ws');
const wss = new WebSocket.Server({ port: 8000 });

var CLIENTS=[]; // クライアントのリスト
var id;

wss.on('connection', function(ws) {
    id = Math.floor(Math.random() * 999999999);
    console.log('新しいクライアント: ' + id);
    CLIENTS.push(ws); //クライアントを登録

    ws.on('message', function(message) {
        console.log('received: %s', message);
        ws.send("self message : " + message);  // 自分自身にメッセージを返す

        for (var j=0; j < CLIENTS.length; j++) {
          //他の接続しているクライアントにメッセージを一斉送信
            if(ws !== CLIENTS[j]) {CLIENTS[j].send("send from " + id + " : " + message);}
        }
    });

    ws.on('close', function() {
        console.log('ユーザー:' + id + ' がブラウザを閉じました');
        delete CLIENTS[id];
    });
});

app.get('/', function(req, res) {
    fs.readFile("./index.html", function (err, data) {
        res.writeHead(200, { "Content-Type": "text/html" });
        res.write(data);
        res.end();
    });
});

app.listen(8080);
実行結果
こんな感じで、複数ブラウザで同時にログインし、送信ボタンを押すと、すべてのブラウザに「hello」メッセージが共有されます。

【Ubuntu】React Nativeの環境構築 →WebとAndroidでHello World!
Cross Platformなフレームワーク
React, Flutter, Electronなどなど、現在は色々なフレームワークがあります。で、まとめるとこうなります。
| フレームワーク | 使用言語 | パフォーマンス | コミュニティ(情報量) | 対応OS |
| ionic | CSS, HTML, TypeScript + JS | △ | ○ | Android iOS Windows |
| React Native | CJS + (Java, Swift, Objective-C) | ○ | ◎ | Android, iOS, (Winsows) |
| Xamarin | C# (.NET環境) | ○ | ○ | Android, iOS, Windows |
| Flutter | Dart | ◎ | △ | Android, iOS |
| Electron | JS, HTML, CSS | ? | ? | Mac, Windows, Linux |
| Unity | C# | ? | ◎ | iOS, Android, Web, Windows, Mac, Linux, PlayStation等ほか多数 |
| Monaca | HTML, JS | ? | △ | iOS, Android, Windows, Mac, Web |
ionic
- ☓ ゲーム用には適していない
- ☓ セキュリティで困難があるかも
React Native
Xamarin
- Microsoftが提供
- ザマリンと読む
- .NETに慣れている人は良いかも。
Unity
- ここで紹介しているなかでは唯一オープンソースではない
- 3Dグラフィックス/ゲームアプリの開発
Which is the Best Cross Platform Mobile App Development Framework? - Radixweb
Google Trendによるトレンド
2021年4月現在、単純な検索数だけだと、Unity > Electron = Flutter > React Native > Xamarin >> Monacal の順番ですね。
まぁでも用途によって色々違うだろうし、検索トレンドだけで判断するのは、本当に、なんだかなぁという感じです、
まぁでも今回はReact Nativeを使います。
React Nativeの環境構築
https://qiita.com/sengoku/items/5555fcc10980b7780714
テスト環境は以下の通り:
以下のコマンドを実行して色々インストールします。
Node.jsのインストール
$ sudo apt update
$ sudo apt install nodejs
$ sudo apt install npm
JDKのインストール
$ sudo apt-get install openjdk-8-jdk
$ sudo update-java-alternatives --set java-1.8.0-openjdk-amd64
Expoのインストール
Expoとは、
> Expo is an open-source platform for making universal native apps for Android, iOS, and the web with JavaScript and React.
だそうです。( https://expo.io/より)
以下のコマンドでインストールします。
$ sudo npm install --global expo-cli
バージョン確認
上のコマンドでインストールした諸々のバージョンは以下の通り:
$ npm --version
6.14.4

$ node --version
v10.19.0

$ java -version
openjdk version "1.8.0_282"
OpenJDK Runtime Environment (build 1.8.0_282-8u282-b08-0ubuntu1~20.04-b08)
OpenJDK 64-Bit Server VM (build 25.282-b08, mixed mode)

$ javac -version
javac 1.8.0_282
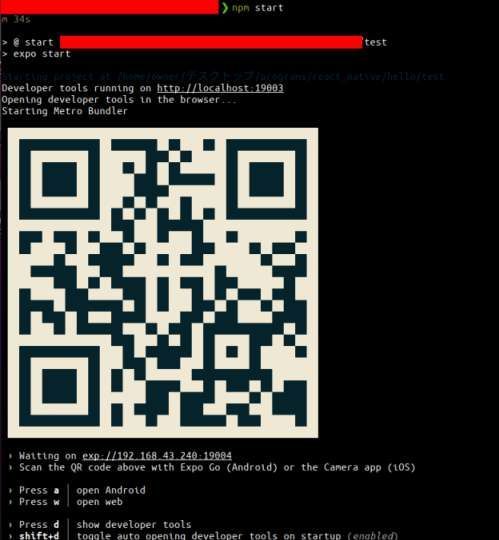
プロジェクト作成
適当な空ディレクトリに行って、testプロジェクトを作成します。
$ create-react-native-app test
✔ How would you like to start › Default new app
✔ Downloaded and extracted project files.

Using npm to install packages.
testプロジェクトを作成しました。
最初プロジェクトの種類を聞かれるので、default new appを選択します。
test/App.jsを好きなように編集してみて下さい。
例:
import * as React from "react";
import { View, Text } from "react-native";

export default function App() {
  return (
    <View style={{flex: 1,justifyContent: "center",alignItems: "center",}} >
      <Text>Universal React with Expo, Hello World!!!</Text>
    </View>
  );
}