【Python】Tkinker第3回 ボタン作成
今回は、ボタンを作成します。
サンプルプログラム
以下のプログラムを実行してください。
import tkinter

class MyApp1(tkinter.Frame):
    def __init__(self, master=None):
        super().__init__(master)
        self.pack()
        self.Button1 = tkinter.Button(self)
        self.Button1["text"] = "Click here!" #ボタンのテキスト
        self.Button1["command"] = self.Button1_Func #割り込み関数
        self.Button1.pack(side="top")

        self.ButtonQuit = tkinter.Button(self, bg='#000000', fg='#ffffff', width=30, height = 10)
        self.ButtonQuit["text"] = "QUIT"
        self.ButtonQuit["command"] = self.QuitApp
        self.ButtonQuit.pack(side="top")

    def Button1_Func(self):
        print("Hello, World!")

    def QuitApp(self):
        print("quit this App")
        self.master.destroy()

root = tkinter.Tk()
root.geometry("400x300")
app = MyApp1(master=root)
app.mainloop()
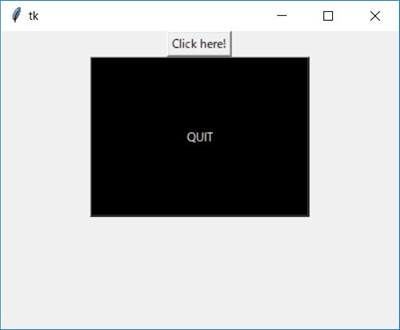
実行結果

このようになればOKです。
また、「Click me!」という明らかに詐欺のにおいがするようなボタンを押すと、コンソール上に「Hello, World!」と表示されます。
「QUIT」ボタンを押すと、コンソールに「quit this App」と表示されてAppが終了します。
簡単に解説
今回から、クラスを使ってAppを作成していきます。
ですが、基本的な部分は全く同じで、クラスの継承について分かっていれば普通に読み進められると思います。
本題のボタン作成ですが、以下のようなコードで行います。
root = tkinter.Tk()
Button1 = tkinter.Button(root)  #ボタン作成
Button1["text"] = "Click here!" #ボタンのテキスト設定
Button1["command"] = self.Button1_Func #割り込み関数設定
Button1.pack(side="top") #ボタンの設置位置変更
STEP1.ボタン作成
まず、 tkinter.Button() でボタンを作成します。
btn = tkinter.Button(root, text='Click here', bg='#ffffff', fg='#000000', width=30, height = 5)
のように、一気に設定することもできます。
もしくは、一旦、下のコードでボタンを作成して
Button1 = tkinter.Button(root) #ボタン作成
その後でいろいろ設定することもできます。
Button1 = tkinter.Button(root)  #ボタン作成
Button1["text"] = "Click here!" #ボタンのテキスト設定
Button1["command"] = self.Button1_Func #割り込み関数設定
一応、それぞれの引数の説明をすると、このようになります。
| 例 | 説明 |
|---|---|
| text | ボタンの文字(日本語対応) |
| fg="white" | 文字色(デフォルトは黒) |
| bg="black" | ボタン色 |
| command | ボタンが押された時実行される割り込み関数 |
| height = 20 | ボタンの高さ |
| width = 20 | ボタンの横幅 |
STEP2.ボタンを配置
Button1.pack(side="top") #ボタンの設置位置変更
pack()関数でボタンの表示位置を変更します。
side引数には「top, bottom, left, right」の5種類を設定することができ、それぞれ画面の上側、下側、左側、右側に文字を置きます。
また、
Button1.place(x=10, y=60)
と書くことで座標で表示位置を指定することもできます。