【OpenCV/C++】画像に3DLUTをあてる(適応させる)プログラム!(立方体補正)
LUTとは
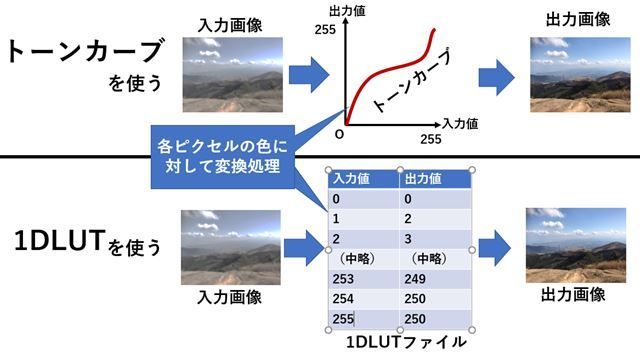
LUT(Lookup Table、ルックアップテーブル)とは、
複雑な計算処理を単純な配列の参照処理で置き換えて効率化を図るために作られた、配列や連想配列などのデータ構造のことをいう。(by Wikipedia)
だそうですが、画像処理の場合はカラーグレーディングで使われる技術の一つを表しています。LUT情報を格納しているファイル(拡張子は.cubeなど)があり、それを画像に適応すると色身の補正を行ってくれる、というものです。
LUTファイルの中には、入力されたRGB色と、それに対応する出力用のRGB色が一覧表(1DLUTの場合は少し違う)の様に書かれています。このRGB色の対応表を利用して、画像の色身を補正しようという考え方です。

1DLUTと3DLUT
画像処理の分野では1DLUTと3DLUTがあります。(D→Dimension「次元」の意味)
それぞれの違いは入出力の値にあります。
上の画像の表は1DLUTを表しています。3DLUTは
| 入力色 | 出力色 |
| (0.0, 0.0, 0.0) | (0.0, 0.0, 0.0) |
| (0.5, 0.0, 0.0) | (0.6, 0.03, 0.05) |
| (1.0, 0.0, 0.0) | (1.0, 0.1, 0.1) |
| (0.0, 0.5, 0.0) | (0.0, 0.5, 0.0) |
| 略 | 略 |
| (1.0,1.0,1.0) | (1.0,1.0,1.0) |
の様になっています。3DLUTファイルの一つである.cubeファイルの中身をのぞいてみると、以下のようになっています。
# Vlog_to_V709_forV35_ver100.cube by panasonic
LUT_3D_SIZE 33

0.015625 0.015625 0.015625
0.028320 0.011719 0.013184
0.040771 0.008057 0.010742
0.054688 0.003906 0.008301
0.072021 0.000000 0.004883
0.093750 0.000000 0.000977
0.120850 0.000000 0.000000

(略)

0.995116 1.000000 1.000000
0.996825 1.000000 1.000000
0.998535 1.000000 1.000000
1.000000 1.000000 1.000000
LUTファイルの拡張子
- 3dl
- .cube
- .csp
- vlt
等がよく見ます。
↑このサイトを見ると、他にも
- .lut
- .cdl
- .ccc
- .clf
- .itx
- .look
- .m3d、.mga
- .spi1d
- .spi3d
- .spimtx
- .vf
などいろいろあるようです。
LUTの格子点
ということで、↑の考え方に基づくならば、3DLUTには全ての色に対する出力色の対応表が格納されていることになりますが、
もし10bitの画像だった場合、LUTファイルの容量はも必要になります(参考)。これはまずいです。3DLUTですべての組み合わせのテーブルを準備することは事実上不可能という事になります。
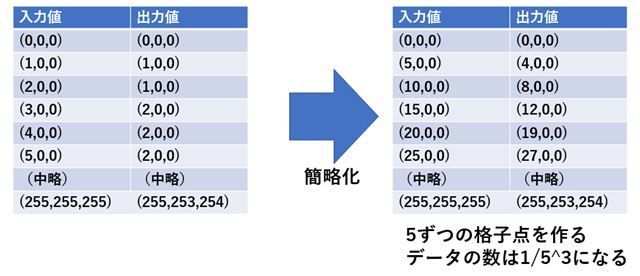
そこで、対応色を間引いてLUTファイルに保存しよう、という事になりました。RGB色空間で見た時にその保存するデータの点が格子状になり、「格子点」という呼ばれ方をしています。

主な格子点数は17、33、65などです。(0~256(10bitの場合は0~1024)までの値をそれぞれ17、33、65分割するという意味)
立方体補間
上の節で、LUTファイルの容量を節約するため、データを間引きました。しかし、LUTをあてる(適応させる)時には間引いたデータを復元する必要があります。
その為に、この記事では立方体補間()を使います。(←あくまで「この記事では」の範囲内。ほかにも三角錐補間などがある。)
立方体補間とトライリニア補間の違いが判らなかったので、ここら辺は間違っているかもしれませんが、もし一緒ならば補間の計算式は↓に載っていました。
Trilinear interpolation - Wikipedia
プログラム(補間なし)
# include <opencv2/opencv.hpp>
# include <opencv2/highgui.hpp>
# include <iostream>
#include <vector>
#include <string>
#include <fstream>

#define DISP(X) (std::cout << #X << " = "  << X << std::endl)

// https://qiita.com/iseki-masaya/items/70b4ee6e0877d12dafa8 を参考にしました
std::vector<std::string> split_naive(const std::string &s, const char delim) {
  std::vector<std::string> elems;
  std::string item;
  for (char ch : s) {
    if (ch == ' ') {
      if (!item.empty())
        elems.push_back(item);
      item.clear();
    }else {item += ch; }
  }
  if (!item.empty())
    elems.push_back(item);
  return elems;
}

#define LUT_SIZE 33

class my3D_lut_simple{
private:
  int lut_size;
  cv::Mat src;
  cv::Mat dst;
  unsigned char lut_data[LUT_SIZE * LUT_SIZE * LUT_SIZE][3];

public:
  // read .cube file
  int read_lut_file(std::string filename) {
    std::ifstream ifs(filename);
    std::string one_line;

    int i = 0;
    while(i < LUT_SIZE * LUT_SIZE * LUT_SIZE){
      getline(ifs, one_line);
      std::vector<std::string> values = split_naive(one_line, (char)" ");


      if (values.size() != 3) { std::cout << one_line << " --> " << values.size() << std::endl; continue; }

      lut_data[i][0] = ::atof(values[0].c_str()) * 255;
      lut_data[i][1] = ::atof(values[1].c_str()) * 255;
      lut_data[i][2] = ::atof(values[2].c_str()) * 255;
      i++;
    }
  }

  void setSrcImg(cv::Mat src_img) {
    src = src_img;
    dst = cv::Mat::zeros(src.size(), src.type());
  }

  void convert() {
    if (src.empty()) { std::cout << "src image is empty!"; return; }

    int x, y, index;
    int r, g, b;
    for (y = 0; y < src.rows; y++) {
      cv::Vec3b* p_src = src.ptr<cv::Vec3b>(y);
      cv::Vec3b* p_dst = dst.ptr<cv::Vec3b>(y);

      for (x = 0; x < src.cols; x++) {
        r = float(p_src[x][0]) * LUT_SIZE / 256.0f;
        g = float(p_src[x][1]) * LUT_SIZE / 256.0f;
        b = float(p_src[x][2]) * LUT_SIZE / 256.0f;
        index = r + g * LUT_SIZE + b*LUT_SIZE * LUT_SIZE;

        assert(index > 35936);

        p_dst[x][0] = lut_data[index][0];
        p_dst[x][1] = lut_data[index][1];
        p_dst[x][2] = lut_data[index][2];
      }
    }
  }

  cv::Mat getResultImg() {
    return dst;
  }
};


int main() {
  my3D_lut_simple myLut;
  cv::Mat img = cv::imread("test.jpg");
  myLut.setSrcImg(img);
  myLut.read_lut_file("test.cube");

  std::cout << "convert start!\n";
  myLut.convert();
  std::cout << "convert finished!\n";

  cv::Mat dst = myLut.getResultImg();

  cv::imshow("test", dst);
  cv::waitKey(0);

  return 0;
}
実行結果(補間なし)
コンパイルして作成された実行ファイルと同じ場所にtest.jpgとtest.cubeを持ってきます。
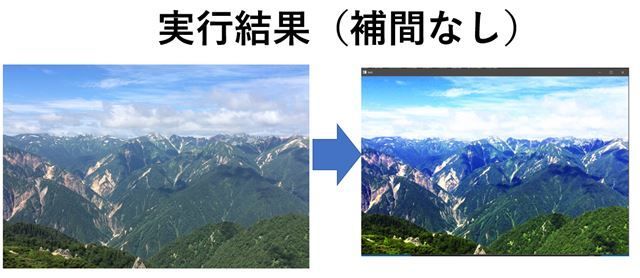
そして実行すると、以下の様にLUTが適応された画像が表示されます。

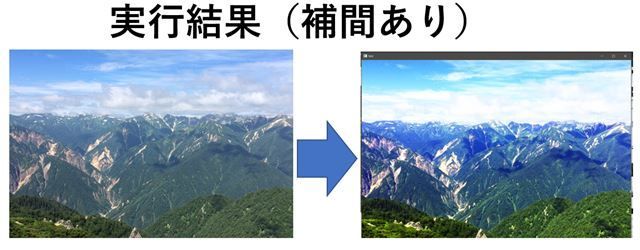
補完していないので、色がきれいなグラデーションにならず、階段状になっています。これを解決するために下の様なプログラムを書きました。
この画像は、2017年に北アルプスに行ったときの画像です。今年はコロナであきらめましたが、またいつか北アルプス行きたいです~~。燕岳最高!!
プログラム(補間あり)
計算にそれほど時間はかかりませんが、スピードを考えて作ったプログラムではありません。
「動けばいいか」という程度の考えで作ったので、最適化は一切考えていないです。
# include <opencv2/opencv.hpp>
# include <opencv2/highgui.hpp>
# include <opencv2/videoio.hpp>
# include <iostream>
#include <vector>
#include <string>
#include <fstream>

#define DISP(X) (std::cout << #X << " = "  << X << std::endl)

// https://qiita.com/iseki-masaya/items/70b4ee6e0877d12dafa8 を参考にしました
std::vector<std::string> split_naive(const std::string &s, const char delim) {
  std::vector<std::string> elems;
  std::string item;
  for (char ch : s) {
    if (ch == ' ') {
      if (!item.empty()) elems.push_back(item);
      item.clear();
    }else { item += ch;}
  }
  if (!item.empty()) elems.push_back(item);
  return elems;
}

#define LUT_SIZE 33

class my3D_lut {
private:
  int lut_size;
  cv::Mat src;
  cv::Mat dst;
  cv::Vec3f lut_data[LUT_SIZE * LUT_SIZE * LUT_SIZE];

public:
  // read .cube file
  int read_lut_file(std::string filename) {
    std::ifstream ifs(filename);
    std::string one_line;

    int i = 0;
    while (i < LUT_SIZE * LUT_SIZE * LUT_SIZE) {
      getline(ifs, one_line);
      std::vector<std::string> values = split_naive(one_line, (char)" ");

      if (values.size() != 3) { std::cout << one_line << " --> " << values.size() << std::endl; continue; }

      lut_data[i][0] = ::atof(values[0].c_str());
      lut_data[i][1] = ::atof(values[1].c_str());
      lut_data[i][2] = ::atof(values[2].c_str());
      i++;
    }
  }

  void setSrcImg(cv::Mat src_img) {
    src = src_img;
    dst = cv::Mat::zeros(src.size(), src.type());
  }

  cv::Vec3f _convert_pixel(cv::Vec3b color) {
    unsigned char pos[3]; // 0~33
    float delta[3]; //

    pos[0] = color[0] * LUT_SIZE / 256;
    pos[1] = color[1] * LUT_SIZE / 256;
    pos[2] = color[2] * LUT_SIZE / 256;

    delta[0] = float(color[0] * LUT_SIZE) / 256.0f - pos[0];
    delta[1] = float(color[1] * LUT_SIZE) / 256.0f - pos[1];
    delta[2] = float(color[2] * LUT_SIZE) / 256.0f - pos[2];


    cv::Vec3f vertex_color[8];
    cv::Vec3f surf_color[4];
    cv::Vec3f line_color[2];
    cv::Vec3f out_color;

    int index = pos[0] + pos[1] * LUT_SIZE + pos[2] * LUT_SIZE * LUT_SIZE;
    const int max_range = 33 * 33 * 33 - 1;

    unsigned int next_index[3] = { 1, LUT_SIZE, LUT_SIZE * LUT_SIZE };
    if (index % LUT_SIZE == LUT_SIZE - 1) { next_index[0] = 0; }
    if ((index/LUT_SIZE) % LUT_SIZE == LUT_SIZE - 1) { next_index[1] = 0; }
    if ((index/(LUT_SIZE * LUT_SIZE))% LUT_SIZE == LUT_SIZE - 1) {next_index[2] = 0;}

    // https://en.wikipedia.org/wiki/Trilinear_interpolation
    vertex_color[0] = lut_data[index];
    vertex_color[1] = lut_data[index + next_index[0]];
    vertex_color[2] = lut_data[index + next_index[0] + next_index[1]];
    vertex_color[3] = lut_data[index + next_index[1]];
    vertex_color[4] = lut_data[index + next_index[2]];
    vertex_color[5] = lut_data[index + next_index[0] + next_index[2]];
    vertex_color[6] = lut_data[index + next_index[0] + next_index[1] + next_index[2]];
    vertex_color[7] = lut_data[index + next_index[1] + next_index[2]];

    surf_color[0] = vertex_color[0] * (1.0f - delta[2]) + vertex_color[4] * delta[2];
    surf_color[1] = vertex_color[1] * (1.0f - delta[2]) + vertex_color[5] * delta[2];
    surf_color[2] = vertex_color[2] * (1.0f - delta[2]) + vertex_color[6] * delta[2];
    surf_color[3] = vertex_color[3] * (1.0f - delta[2]) + vertex_color[7] * delta[2];

    line_color[0] = surf_color[0] * (1.0f - delta[0]) + surf_color[1] * delta[0];
    line_color[1] = surf_color[2] * (1.0f - delta[0]) + surf_color[3] * delta[0];

    out_color = line_color[0] * (1.0f - delta[1]) + line_color[1] * delta[1];

    return out_color;
  }


  void convert() {
    if (src.empty()) { std::cout << "src image is empty!"; return; }
    int x, y, index;
    for (y = 0; y < src.rows; y++) {
      cv::Vec3b* p_src = src.ptr<cv::Vec3b>(y);
      cv::Vec3b* p_dst = dst.ptr<cv::Vec3b>(y);

      for (x = 0; x < src.cols; x++) {
        cv::Vec3f color_out = _convert_pixel(p_src[x]);
        p_dst[x] = cv::Vec3b(color_out[0] * 255.0, color_out[1] * 255.0, color_out[2] * 255.0 );
      }
    }
  }

  cv::Mat getResultImg() {return dst;}
};


int main() {
  my3D_lut myLut;
  cv::Mat img = cv::imread("test.jpg");
  myLut.setSrcImg(img);
  myLut.read_lut_file("test.cube");

  std::cout << "convert start!\n";
  myLut.convert();
  std::cout << "convert finished!\n";

  cv::Mat dst = myLut.getResultImg();

  cv::imshow("test", dst);
  cv::waitKey(0);

  return 0;
}

